At the end of term 1, we started our etching, which was to be due at on the Monday of week seven. We had to etch one of the five collages from term one, but Mrs. Vincent suggested to do our black and white collage, because it would be easier to etch as the lines were already there, so we basically just had to trace the picture. The collage had to be trimmed, in order for the sheet of plastic to fit over it without cutting anything important out. An etching needle was then used to scratch away at the plastic. We had to scratch over the lines of the collage; if the lines were darker, we had to press harder and scratch the lines closer together. To create simulated texture, a variety of directional lines were used. Once our etching was done, we then moved on to printing. The printing process is as followed:
1. Write your name, class, teacher and number on a piece of paper
2. Put the paper in the water bath
3. Steps 4-6 are done while wearing
4. Put a generous amount of ink (either black, red or blue) on your etched plastic, and rub the ink into the grooves by using a dabber
5. Once all the grooves are filled with ink, grab a piece of newspaper, scrunch it up into a ball, and wipe off the excess ink from the plastic
6. When the only ink that’s left on the plastic is in the grooves, it’s time to print!
7. Get your paper out of the water bath and dry it using butchers paper.
8. Place a piece of newspaper in the printing press with the fold facing towards the middle
9. Open the newspaper up and put the paper name-side down and put the plastic etched-side down
10. Fold the newspaper and blanket back over, so that the newspaper is folded in two, and so the blanket is covering the whole thing
11. Turn the handle on the printing press! Make sure you turn it all the way.
12. Fold back the blanket and newspaper, and carefully peel off the plastic from the paper
13. Put the paper on the drying rack and Voila! You are finished!
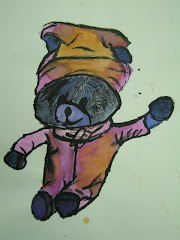
We were required to do at least four black and one coloured. I decided to do two coloured prints: one purple and the other red. We had to choose our best black print for the exhibition, and our second best to colour in. I thought that my best black was my fourth print and my second best was my second print. I chose to colour in my second black print very bright and use surrealistic colours, apart from the man, because it is supposed to be a normal man and his dog stumbling across a surreal world.
Overall, I really enjoyed the etching process, even though it did get tiring and even sometimes boring after etching the same thing for almost seven weeks. It was hard work as well; getting the fine details of the thin lines and forcing the ink into the grooves of the plastic. But I have enjoyed the roundabout nine weeks of etching and printing.
1. Write your name, class, teacher and number on a piece of paper
2. Put the paper in the water bath
3. Steps 4-6 are done while wearing
4. Put a generous amount of ink (either black, red or blue) on your etched plastic, and rub the ink into the grooves by using a dabber
5. Once all the grooves are filled with ink, grab a piece of newspaper, scrunch it up into a ball, and wipe off the excess ink from the plastic
6. When the only ink that’s left on the plastic is in the grooves, it’s time to print!
7. Get your paper out of the water bath and dry it using butchers paper.
8. Place a piece of newspaper in the printing press with the fold facing towards the middle
9. Open the newspaper up and put the paper name-side down and put the plastic etched-side down
10. Fold the newspaper and blanket back over, so that the newspaper is folded in two, and so the blanket is covering the whole thing
11. Turn the handle on the printing press! Make sure you turn it all the way.
12. Fold back the blanket and newspaper, and carefully peel off the plastic from the paper
13. Put the paper on the drying rack and Voila! You are finished!
We were required to do at least four black and one coloured. I decided to do two coloured prints: one purple and the other red. We had to choose our best black print for the exhibition, and our second best to colour in. I thought that my best black was my fourth print and my second best was my second print. I chose to colour in my second black print very bright and use surrealistic colours, apart from the man, because it is supposed to be a normal man and his dog stumbling across a surreal world.
Overall, I really enjoyed the etching process, even though it did get tiring and even sometimes boring after etching the same thing for almost seven weeks. It was hard work as well; getting the fine details of the thin lines and forcing the ink into the grooves of the plastic. But I have enjoyed the roundabout nine weeks of etching and printing.